This fifth Wii programming tutorial will cover how to display JPEG images. As usual, I’m assuming you’ve read all the other tutorials. You can grab the PDF of this tutorial here: codemii-tutorial-5
Firstly download this tutorial5-blank which will contain the required files to get us started. Extract this zip file in C:\devkitPro\examples\gamecube. Open up tutorial5.pnproj and then click on main.c to show the source code.
Included in the download are two files, one called picture.s and a JPEG picture. The picture.s file defines all our variables for the picture and the link to the picture itself. If you open the image file “about.jpg” you’ll see the image with a black background. It’s important to remember that JPEGs aren’t transparent like PNGs are.
The next step needed is to download this libogc_jpeg zip file which contains the required JPEG library. You’ll need to extract it to C:\devkitPro\devkitPPC\powerpc-gekko and let it overwrite any directories.
Now we need to modify our makefile to add in the JPEG library:
[sourcecode language=’c’]LIBS := -logc -lm -ljpeg[/sourcecode]
We can now focus on editing the main.c file. Firstly we’ll need to include the jpeg header file so we can access the jpeg functions.
[sourcecode language=’c’]#include
Two variables need to be defined are piclength and picdata which are both found in the picture.s file. We define these two variables as exern which tells the compiler that we have defined these two variables elsewhere (picture.s) and these variables will be able to be accessed globally.
[sourcecode language=’c’]extern char picdata[];
extern int piclength; [/sourcecode]
The next thing we add is a jpeg function which I have hacked together:
[sourcecode language=’c’]void display_jpeg(JPEGIMG jpeg, int x, int y) {
unsigned int *jpegout = (unsigned int *) jpeg.outbuffer;
int i,j;
int height = jpeg.height;
int width = jpeg.width/2;
for(i=0;i<=width;i++)
for(j=0;j<=height-2;j++)
xfb[(i+x)+320*(j+16+y)]=jpegout[i+width*j];
free(jpeg.outbuffer);
}[/sourcecode]
The above function takes a JPEGIMG structured variable and two integers which will be used to determine where on the screen we want our image to be displayed.
The first line in the function is related to how the jpeg library works. Later on you’ll see that we decompress the jpeg images and when doing so, the jpeg.outbuffer is where the image is stored.
The next few lines define some local variables for the height and width and then copy the jpeg image to out video frame buffer (the screen) to the co-ordinates that we have defined in as x and y. The last line in the function ensures that we clear the space in memory that we made a local copy of the jpeg image (unsigned int *jpegout = (unsigned int *) jpeg.outbuffer; )
We can now start adding jpeg functions the main() function. First things first we define the variable to use that will use the JPEGIMG data structure.
[sourcecode language='c']JPEGIMG about; [/sourcecode]
After that we assign memory to our “about” variable.
[sourcecode language='c']memset(&about, 0, sizeof(JPEGIMG)); [/sourcecode]
According to our picture.s file, it contains two variables; the picture data and the length of the picture. We define our “about” variable inbuffer and inbufferlength with both the global variables.
[sourcecode language='c']about.inbuffer = picdata;
about.inbufferlength = piclength; [/sourcecode]
We then need to decompress the jpeg, by passing the “about” variable.
[sourcecode language='c']JPEG_Decompress(&about); [/sourcecode]
Our last step is to run the display_jpeg function and pass our variable “about” and any x and y co-ordinates we want.
[sourcecode language='c']display_jpeg(about, 60, 100); [/sourcecode]
Our main function now looks like:
[sourcecode language='c']int main() {
JPEGIMG about;
memset(&about, 0, sizeof(JPEGIMG));
about.inbuffer = picdata;
about.inbufferlength = piclength;
JPEG_Decompress(&about);
Initialise();
display_jpeg(about, 60, 100);
return 0;
}[/sourcecode]
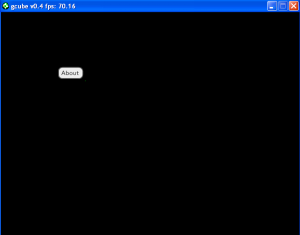
tutorial5-jpeg is what our source now looks like. Compile the source and run tutorial5.dol with gcube. You’ll see the image displayed on the screen. I won’t convert this to the Wii as there won’t be any difference between them.

I didn’t have issues with the other tutorials but this one keeps giving me errors.
This was the first one
> “make”
main.c
In file included from C:/devkitPro/examples/gamecube/tutorial5/source/main.c:7:
C:/devkitPro/devkitPPC/powerpc-eabi/include/jpeg/jpgogc.h:12:10: fatal error: jpeglib.h: No such file or directory
12 | #include
| ^~~~~~~~~~~
compilation terminated.
I didn’t extract the files into C:\devkitPro\devkitPPC\powerpc-gekko because gekko didn’t exist, but I have eabi instead of gekko.
Then I put it into chat gpt and it had me do:
set DEVKITPPC=C:/devkitPro/devkitPPC
into microsoft’s command prompt, and add
INCLUDE := -IC:/devkitPro/devkitPPC/powerpc-eabi/include/jpeg
CFLAGS = -g -O2 -Wall $(MACHDEP) $(INCLUDE)
LIBS := -logc -lm -ljpeg -LC:/devkitPro/devkitPPC/powerpc-eabi/lib
Which just doesn’t seem right to me based on how everything was fine before, so I was curious if anyone might know why? I’m probably just not doing something basic I guess (I was following a youtube tutorial which had to tell me how to set up the make command which I don’t think was covered on this site’s tutorial, so I guess it’s supposed to be common/basic knowledge)
I’ve found that the best thing to do is to use any program — programmer’s notepad, notepad, studio code, etc. — to edit/write the code and then use msys — a shell program included with devkitpro — to compile with the make command. I’ve had issues with this site’s tutorial examples, but can use the examples included with devkitpro to fill in the blanks.